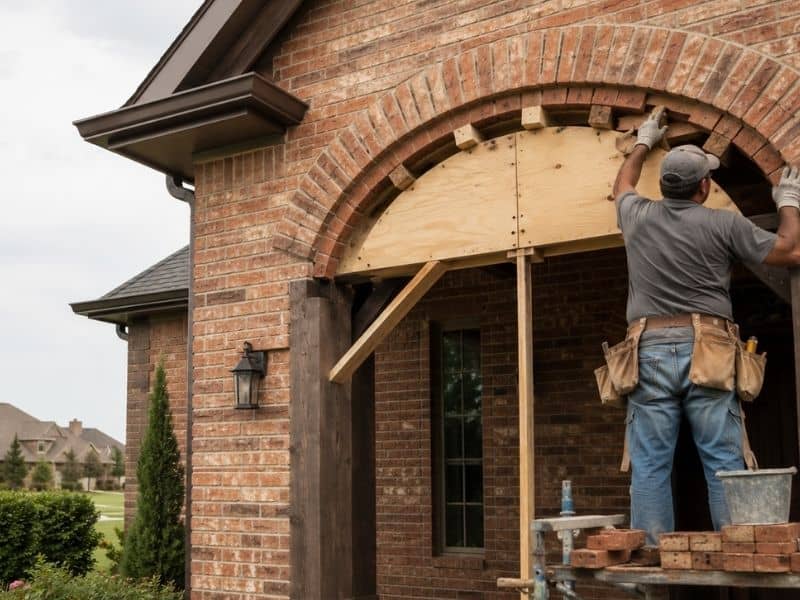
Frisco custom exterior projects often use brick arches to soften an entry, frame a window, or add detail to a covered porch. The finished curve gets the attention, but its performance depends on what supports it from the start.
A brick arch looks like a simple shape once it’s built. Underneath that shape is a small structural system, working out how weight moves through the curve and into the wall on either side. Get the support wrong, and an arch can crack, settle unevenly, or push the brick around it out of place. None of that shows up on day one. It shows up months or years later.
An Arch Transfers Weight Sideways, Not Just Downward
A flat lintel over a window carries weight straight down onto the wall below it. An arch works differently. It takes the load pressing down on the curve and pushes part of that force outward, toward the sides, before sending it down into the wall.
This sideways push is called thrust. It means the areas on either end of the arch aren’t just holding up weight from above, they’re also resisting a push trying to spread the arch apart at the bottom.
That changes how the ends of an arch need to be planned. They need enough solid wall, or the right kind of support behind them, to handle that outward push, not just the downward load. This has to be worked out before the curve is built, not adjusted after the fact. Once an arch is set in place, there’s no easy way to add support it should have had from the start.
The Springing Line Is Where the Arch Plan Truly Starts
Every arch has a springing line. It’s the level where the straight wall ends and the curve begins on each side.
Both sides of that line need to sit at the same elevation. If one side starts even slightly higher or lower than the other, the curve won’t come together evenly at the top, and the finished arch will look off no matter how carefully the brick above it is laid.
The springing line also needs a stable, correctly prepared support underneath it on both sides. This is usually a solid section of wall, a pier, or another structural element built specifically to carry the load and thrust coming from that point. A brickmason checks this line and its support before laying a single curved brick, since the entire arch depends on both ends starting from the same solid footing.
A Brickmason Plans the Support Zones Before Choosing the Curve
The shape of an arch isn’t picked from a catalog and then made to work. It comes out of a few practical factors working together.
Opening width plays a part, since a wider opening spreads more thrust outward and asks more of the support on each side. Arch shape matters too. A shallow, flatter curve pushes outward more forcefully than a taller, rounder one, even across the same opening width. Wall construction, whether the brick is a veneer over framing or part of a solid wall system, changes what kind of support is realistic to build behind it. And whatever sits above the arch, whether that’s more brick, a second story, or just roof framing, adds to the load the whole system has to carry.
A brickmason works through these factors before settling on a final curve. Picking a shape purely because it looks good, then trying to make the support work around it, is backward. The support zones on either side should be planned first, with the curve chosen to fit what those zones can actually carry.
Temporary Centering Holds the Shape Until the Masonry Can Work as One
An arch isn’t strong on day one. Each brick is set in wet mortar, and the curve has no real strength until that mortar cures and the whole arch can act as a connected unit.
Centering solves this problem. It’s a temporary form, usually built from wood, shaped to match the curve of the planned arch. The mason lays brick against this form, following its shape exactly, so every joint lines up the way the design calls for.
The centering stays in place through the entire build and for a period after, while the mortar gains strength. Removing it too early is one of the more common mistakes on arch projects, since a curve that looks finished can still be far short of its full strength. A brickmason follows a set curing period, based on conditions and mortar type, before pulling the form and letting the arch carry its own weight for the first time.
The Details Beside and Above the Arch Need a Water-Management Plan
An arch sits in the path of water running down a wall, and its curved shape creates spots where water can collect if the surrounding details aren’t planned correctly.
Flashing needs to route water around the arch and back out, not let it pool at the top of the curve or behind the brick. Drainage space behind the brick, part of the wall assembly identified earlier in planning, needs to stay clear at the arch so water has somewhere to go. Materials next to the arch, whether that’s siding, stone, or trim, need joints and transitions that shed water instead of directing it toward the curve.
These details depend on the specific wall assembly and the exact project design, so there’s no single template that fits every arch. What matters is treating water management as part of the arch plan from the beginning, not something worked out after the brick is already in place. An arch that’s structurally sound but poorly flashed can still develop problems that trace back to water finding a way in above or behind the curve.
