Brick Masonry Expansion Joints Only Work If the Seal Holds

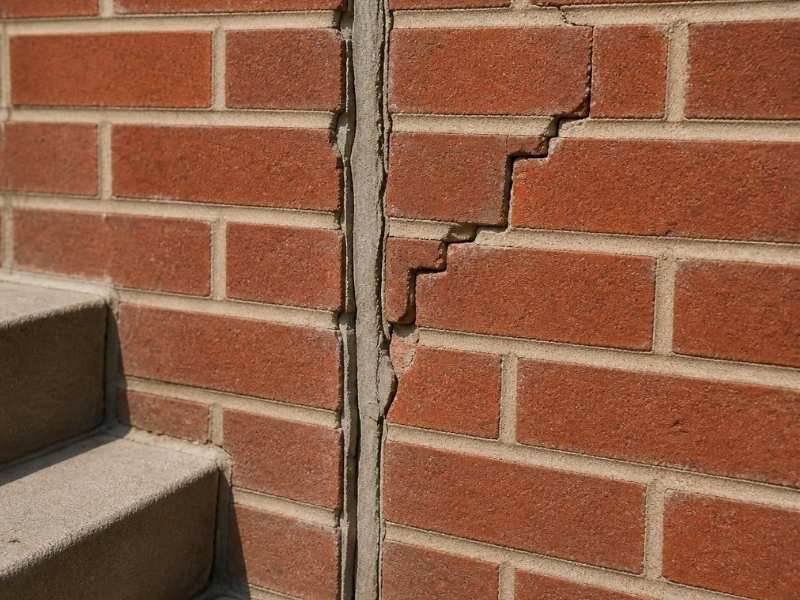
Failed brick masonry expansion joint with cracked sealant and stair-step cracking in Frisco, Texas.

Run your eye down a long brick wall and you will find a thin vertical line filled with soft sealant. That line is one of the brick masonry expansion joints, and it does a quiet but big job. It gives the wall room to grow and shrink as the weather changes. When the seal in that joint hardens, cracks or gets filled with mortar, the wall loses that room and starts to crack on its own. For developers building long walls around Frisco, where summers bake the brick and winter nights drop below freezing, that back-and-forth movement never stops. A joint that cannot move is a wall that will crack.

What an Expansion Joint Is Doing

A brick wall does not sit still. It takes in moisture, warms in the sun and cools at night. Each change makes it swell or shrink a hair, and those small moves add up over a long run. An expansion joint is a planned soft gap that swallows that movement, so the growth lands in the gap instead of the brick.

An expansion joint is different from a mortar joint. A mortar joint is hard and holds brick together. An expansion joint stays open and flexible, filled with backer rod and sealant, so the two sides can move without pushing on each other. Mix those two up and you get the most common mistake on this whole topic.

How to Spot a Joint That Has Failed

The best time to check is twice a year, once in the heat and once in the cold, since a stressed joint shows it most in the extremes. Walk the wall slow and look at each vertical line up close.

  • Sealant that has gone hard, brittle or chalky instead of soft and springy
  • Sealant cracked down the middle or pulled away from the brick on one side
  • A joint packed with mortar or painted over, so it can no longer move
  • A lumpy, wrong-color caulk line where someone patched it fast
  • A long straight wall with no soft joint at all

Press the sealant with a key or screwdriver. Good sealant gives a little. Bad sealant feels like rock or crumbles. A gap that looks dry, split or stuffed with something hard has failed.

What a Bad Joint Does to the Wall

A joint that cannot move pushes the problem into the brick. The wall still wants to grow, but now it has nowhere to go. So it cracks, often near corners, windows or where the wall changes height. Brick edges along the stuck joint can chip and flake off as they grind together. A long run with no joint can even bow out.

Water is the part that turns a small problem into a big one. A split seal lets rain sit in the open joint. On a cold night that water freezes, swells and pries at the brick and mortar around it. Do that a few dozen times over a winter and the edges start to crumble. Caught early, this is a reseal. Left alone, it can turn into brick replacement or a wall that needs rebuilding at one end.

How to Reseal an Expansion Joint the Right Way

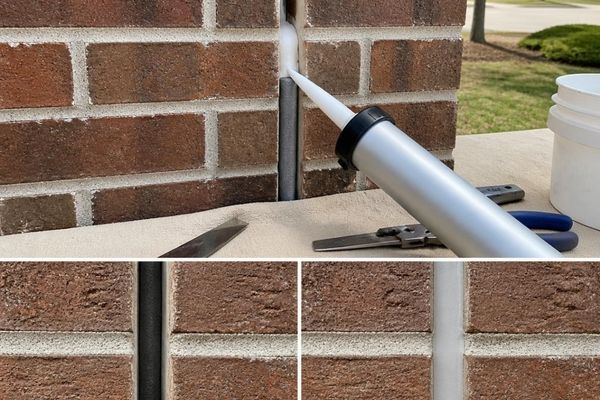
Brick masonry expansion joint repair with backer rod and fresh sealant in Frisco, Texas.

Start by clearing the joint, not covering it. Rake out the old, dead sealant all the way down with a hand tool or an oscillating tool. Brush the joint faces clean so the new sealant can grab bare, dry brick. Do not smear fresh caulk over a cracked line, since it will fail again in a season.

Push in the backer rod to set the right depth. The rod also keeps the sealant from sticking to the back of the joint, which is what lets it stretch. Then fill the joint with a flexible sealant made for masonry. Tool the bead smooth so it presses into both faces and sheds water. Match the joint width the wall was built for, and keep the sealant soft and slightly recessed so it can move. Give it time to cure before rain hits it, which the product label will spell out. Plan the work for a dry day at mild temperature, since wet or freezing brick will not let the sealant grip.

What Never to Do

Never fill an expansion joint with mortar. Hard mortar locks the wall and starts the cracking all over again. Never paint the joint shut, since a coated joint cannot move and the paint hides it from the next person. And never caulk over old dead sealant, because the fresh bead only grips the failure underneath.

When to Bring in a Pro

One clean joint is a steady weekend job. A long wall with many failed joints, a joint packed solid with mortar or a wall built with no joint at all is a different story. Those need a mason, and a missing joint on a tall or load-bearing wall needs an engineer to place it right. Call before the cracks spread, not after.

Frequently Asked Questions

What is the difference between an expansion joint and a mortar joint?

A mortar joint is the hard line that bonds brick to brick. An expansion joint is a soft, open gap built to move. One holds the wall together, the other lets it flex. Filling an expansion joint with hard mortar cancels the whole point of it.

Can I just caulk over a cracked expansion joint?

No. Caulk laid over dead sealant only sticks to the old failure, so it splits again fast. Rake the joint clean, set the backer rod for depth, then apply fresh masonry sealant. Doing it right once beats patching it every year.

How often do expansion joint seals need replacing?

Most joint sealant lasts several years before it hardens or pulls loose, often in the range of ten to twenty. Sun, heat and weather wear it faster. Check the joints once a year and reseal the ones that have gone stiff or cracked before water gets in.

What happens if a long brick wall has no expansion joint?

The wall has no room to grow, so it makes its own room by cracking. You will see cracks near corners and openings, chipped brick edges and sometimes a bow in the wall. Adding a proper joint later takes a mason or engineer, so it is best planned early.

Can a mortar-filled expansion joint be fixed?

Yes, but it takes real work. A mason cuts the mortar back out of the joint, cleans the edges and rebuilds it as a soft joint with backer rod and sealant. Once it can move again, the cracking around it usually stops.

How a Brick Mason Matches Mortar Without Leaving a Patchwork Repair

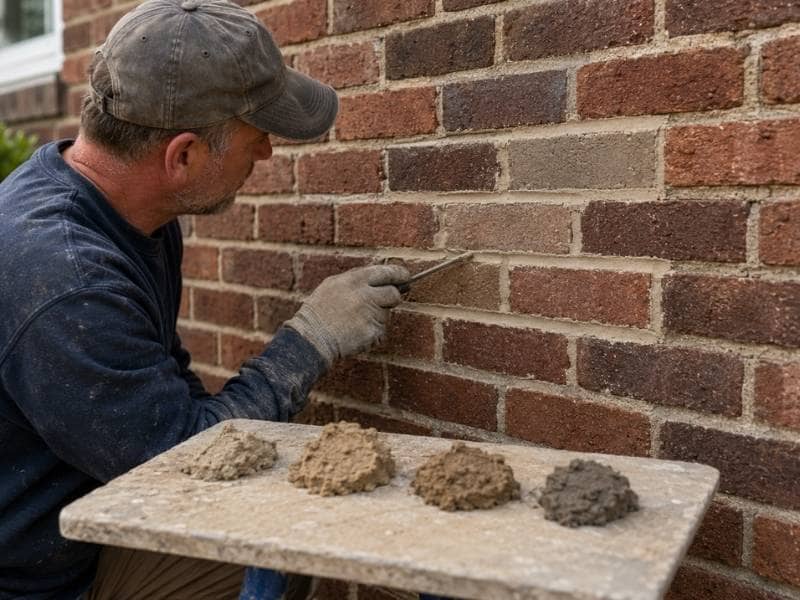
 Brick mason matching mortar samples and carefully tooling new joints to blend a repair into an existing brick wall

A repair can hold up perfectly and still look wrong. When a new mortar sits next to old and the color or shape is off, the eye goes straight to the patch. A skilled brick mason treats mortar matching as an essential part of brick masonry, not an afterthought. The goal is a repair that blends in so well most people never spot it. Getting there takes the right reference, some patient testing, and real attention to how the joint gets finished.

Pull Your Reference From Inside the Joint

The mortar you see on the wall surface has been through a lot. Sun, rain, dirt, and biological growth all change how it looks over the years. Cleaning products and simple age shift the color further. Matching to that weathered face means matching to a color the original mortar never actually was.

A better reference comes from mortar taken from inside the joint, where the weather never reached. That protected material sits closer to the original mix and gives a truer starting color. A mason who chips out a small hidden sample has something honest to match against.

Working from the faded surface almost guarantees a mismatch once the new mortar cures and shows its real tone. The inside of the joint is the closest thing to a time capsule the wall has. Starting there points the whole match in the right direction from the first batch.

Separate the Mortar Color From the Sand

Mortar color isn’t one simple thing. Cement, lime, and any added pigment all feed into it, but the sand does heavy lifting too. Sand color, particle size, and how the grains spread through the mix all shape the finished look. Two mortars can share a recipe and still land in different places because their sand differs.

This is why matching by color alone falls short. A mason who picks a mix that looks close in a bucket can still end up with joints that read as off once they dry. Studying the sand in the original mortar, its shade and its grain, points toward the right blend.

The sand often decides the match more than the cement ever does. A coarse, warm sand and a fine, gray one will finish as different joints even with the same cement and lime. Getting the sand right is half the battle, and it’s the half people skip most.

Test Small Batches and Let Them Cure

Wet mortar and cured mortar are two different colors. Fresh mix looks darker and richer than it will once it dries out and sets. Judging a match while the mortar is still wet leads to joints that turn too light or too gray days later. The cured color is the only one that counts.

The fix is to mix a few trial batches and let each one dry fully before choosing. A mason then holds the cured samples right against the existing wall and compares them in daylight. The closest cured match wins, not the one that looked best wet.

That patience up front prevents a repair that only reveals its mismatch after everything is set and hard to undo. A few test batches cost a little time and almost nothing in material. That small effort saves a joint that would otherwise stand out on the wall for good.

Copy the Shape and Finish of the Old Joints

Color is only half the match. The original joints have a certain depth, width, profile, and surface texture, and all of that reads as strongly as the tone does. A joint tooled to a different shape stands out even when the color is dead on. The light hits it differently, and the eye catches the change.

Reproducing the old joint means matching how it was struck and finished. A joint that sits too smooth, too deep, or shaped with the wrong tool breaks the pattern of the wall. A mason studies the existing profile and works the new joints to the same depth and finish.

Matching the tooling method ties the repair into the surrounding brickwork instead of framing it. The way a joint catches shadow depends on its shape, so a matched profile blends where a mismatched one glares. Small details in the tooling carry more weight than most people expect.

Blend the Edges of the Repair

The last thing you want is a neat rectangle of new mortar announcing itself on the wall. A repair that stops in a clean box draws the eye no matter how good the color is. A brick mason instead picks logical stopping points that follow the natural lines of the brickwork. Feathering the boundary into the surrounding joints softens where old meets new.

Careful work at the edges holds the entire mortar repair together. That means removing the old mortar cleanly, protecting the brick faces during the work, and cleaning the area without harsh scrubbing. Curing the new joints at an even pace helps them settle to a consistent color across the whole repair.

When the boundary disappears into the wall, the patch stops looking like a patch and starts looking like the wall always did. A repair done this way rewards the extra care with something you have to search for to find. That’s the mark of a match done right.

Retaining Wall Height Can Change the Permit Plan Earlier Than Expected

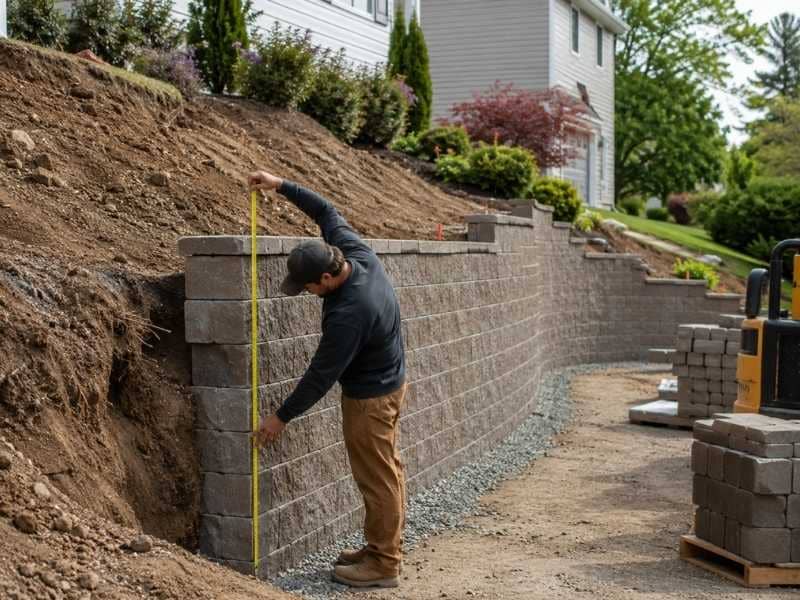
 Retaining wall height being measured from finished grade to the top of a stepped wall on a sloped residential site

A retaining wall project can shift from simple to reviewed based on one number, its height. Many owners plan a low wall, assume no paperwork applies, and start digging before checking the measured height against local rules. The height that decides permit status often isn’t the height people picture in their heads. Getting that measurement right at the planning stage saves a redesign after materials and labor are already committed. A short review early keeps the project from stalling once the work is underway.

Measure Height From the Right Point

Wall height gets measured from the finished grade at the base up to the top of the wall. It isn’t a count of how many visible courses stack up. Two walls with the same number of blocks can measure very differently once the ground around them changes. The grade at the bottom is the reference point that matters most.

Ground rarely runs perfectly level along a wall. As the grade rises and falls, the measured height changes from one end to the other. A wall that reads low where the ground is high can read much taller where the ground drops away.

Measuring at several points, rather than eyeballing one spot, gives the real picture of how tall the wall actually stands. This is easy to get wrong by guessing from the block count alone. A quick set of measurements along the run tells you what the wall truly measures where it counts.

Watch the Line Where a Low Wall Becomes a Reviewed One

Many areas exempt short walls from a permit, often up to a set height in the range of two feet, though the exact figure depends on local code. A wall that stays under that mark may qualify for the exemption. A design that rises above it usually needs a review before work starts. Confirming the local threshold is the first real step, since the number varies from one place to the next.

A few common changes can push a wall past the line without anyone noticing. Adding caps raises the top. Changing the grade at the base lowers the reference point and grows the exposed face. Increasing how much of the wall shows can tip a borderline design over the limit.

Because those tweaks happen during planning, checking the final measured height after every change keeps the permit status accurate. A wall drawn just under the limit can quietly cross it once a cap or a grade change goes in. Rechecking the number after each design decision catches that before it becomes a problem on site.

Judge the Whole Wall, Not Its Average

One short stretch of wall doesn’t set the status for the entire project. People sometimes measure the lowest section, see a comfortable number, and assume the rest clears the same bar. That shortcut misses the sections that climb higher than the plan intended.

Slopes, stepped runs, corners, and low points all pull the height around across a single wall. Part of a wall can cross the threshold even when most of it stays well under. The height that triggers a review is the tallest measured section, not the average of the whole run.

Checking the full length end to end catches the spots that would otherwise get missed until an inspector points them out. It’s the tall corner or the low dip in the grade that usually causes the trouble. Walking the whole wall with a tape, section by section, keeps a single high point from turning the whole job into a surprise.

Look at Site Conditions That Invite a Closer Look

A height exemption isn’t a green light for every part of the design. Even a short wall can run into conditions that call for more review. Nearby structures, property lines, and utility easements all shape what’s allowed in a given spot. Fences, driveways, and any added weight sitting above the wall change the picture too.

Water plays a role here as well, since a wall that blocks or redirects runoff can create problems for a neighbor or for the wall itself. Passing the height test says nothing about whether the placement clears these other conditions. Treating the exemption as full approval is where owners get caught.

A quick look at the surrounding site tells you whether height is the only question or just the first one. A short wall in a tight spot near a property line or an easement can still need a closer review. Checking those conditions early keeps the plan from running into a rule no one thought to look up.

Lock the Design Before Excavation Changes the Site

Once digging starts, the site changes in ways that are hard to walk back. Confirming the full design before that point protects the schedule and the budget. Wall dimensions, drainage details, footing or base preparation, material choice, and the overall retaining wall design all deserve a check while changes are still inexpensive.

An early review catches trouble before it costs real money. Redrawing a wall after the trench is open means throwing away time, and sometimes materials, that already went into the wrong plan. A design confirmed on paper, with the height verified against local rules, lets the crew dig once and build once. That order of operations turns a permit surprise into a quiet non-event.

Brick Pavers That Complement Traditional and Modern Homes

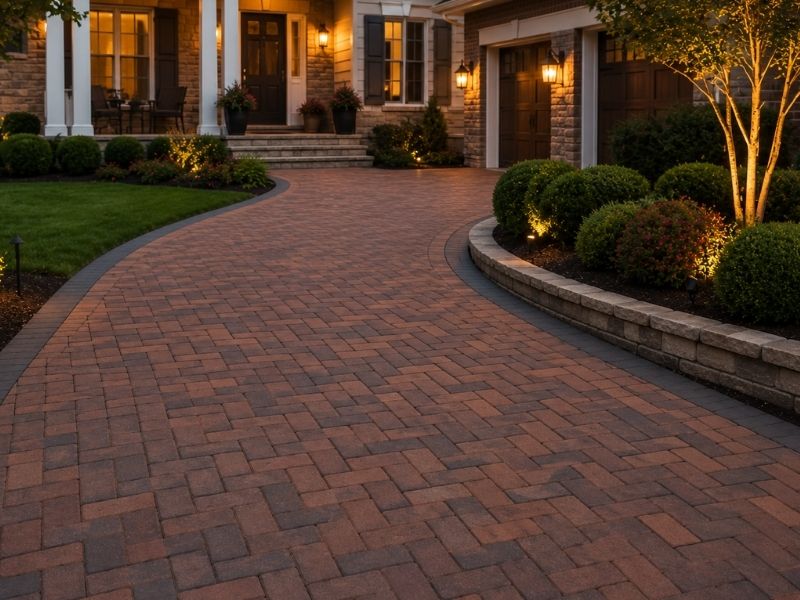
Brick paver driveway in a herringbone pattern complementing a traditional-style home with landscaped front yard in Frisco, TX.

Most people pick brick pavers off a display board in a fluorescent-lit showroom. Then the pallet arrives and the color is wrong. The unit was never the problem. The house was standing right there the whole time, telling you what it wanted, and nobody looked up from the sample.

Start With the Home’s Existing Style and Color Palette

Every house already has a color story. Roof, trim, siding or brick, and the front door all sit in a fixed range you didn’t choose today. Pavers join that group or fight it, and there’s no middle ground.

Stand at the curb and look at your house for a minute. Note the two or three colors that dominate. Those are your limits, and everything below is about working inside them.

Architecture style pushes the same way. A hundred-year-old colonial and a flat-roofed modern box want different units, and the difference is measurable. It comes down to color range, unit size, pattern and edge.

Choose Between Blended and Single-Tone Brick Pavers

Traditional homes take blended color well. A blend mixes several fired shades in one pallet, so the finished surface has depth and slight variation across it. That variation reads as age, and it sits comfortably next to older brick and painted wood trim.

Modern homes want the opposite. A single tone, or a very tight blend, gives a flat even field that matches clean lines and big glass. Charcoal, gray and buff-toned units do this well, and heavy red blends usually don’t.

Here’s the part that catches people. Clay color comes from the clay and the kiln, not from a pigment coat, so what you see is what you get for the life of the unit. That’s a real advantage over dyed concrete, and it also means you can’t adjust it later.

Look at every sample wet. Brick darkens when it rains and the blend shifts, sometimes a lot. A pallet that looked warm and soft in the yard can go dark and busy in the first storm.

Match Paver Size and Proportion to the Space

Unit size changes how big your paving looks. Standard 4 by 8 pavers create a lot of lines in a small area, and all those lines read as detail. Detail suits traditional homes with detailed facades.

Large format units do the reverse. Fewer joints across the same square footage means a quieter surface, and quiet is what a modern facade is after. Long thin plank shapes push that even further.

Scale has to match the space too. Small units on a huge driveway look busy and cheap. Big units on a narrow front walk look clumsy, because you end up cutting half of them.

Use the Paver Pattern to Reinforce the Home’s Design

Pattern is the single most underused decision on this list. Two people can buy the same pallet and get completely different results depending on how it’s laid.

Herringbone reads traditional and it’s the strongest pattern for anything cars drive on, because the interlocking angles resist shifting under load. A 45 degree herringbone reads more formal than a 90 degree one. Basketweave is the most old-fashioned pattern in common use, and it belongs on colonial and cottage homes.

Running bond is the neutral choice and it goes with almost anything. Stack bond, where the joints line up in both directions, is the modern move. It looks deliberate and slightly severe, which is the point.

Select a Pattern That Fits the Architectural Style

Colonial, cottage, farmhouse: basketweave or 45 degree herringbone

Craftsman, tudor, traditional brick: 90 degree herringbone or running bond

Transitional: running bond in a blended color

Modern, contemporary: stack bond or long running bond in a single tone

Treat that as a starting point rather than a rule. A stack bond in a soft red blend can work on a transitional house, and it looks better than either style does alone.

Consider Edge Details, Surface Texture, and Traction

A tumbled paver has been tumbled to knock the corners off, so it looks worn before it’s installed. That works on older homes and it looks silly on a modern one.

Wire-cut units have a rough dragged face with a matte grip. Clean-edge units have crisp corners and a smooth top. The crisp edge is the modern choice, and it also shows every bad cut, so the install has to be sharp.

Texture affects more than looks. Smooth surfaces get slick when wet and wire-cut faces hold traction better. That matters at a step or on a slope, and it’s worth trading a little style for.

Compare Clay Brick Pavers With Concrete Alternatives

Concrete pavers shaped like brick cost less and come in more sizes. They’re pigmented, and pigment fades under sun over the years while fired clay color doesn’t.

Clay brick pavers cost more up front and hold color for decades. On a house where the paving sits next to real brick, the difference shows quickly. On a modern home with no brick anywhere, a good concrete unit is a fair call.

Say it plainly to whoever’s selling you the job. Ask which one you’re being quoted, because “brick pavers” gets used loosely and the two products age nothing alike.

Check Samples and Installation Details Before Ordering

  • Get full-size samples, not chips, and bring them home
  • Lay them against the house wall and the trim, outside, in daylight
  • Wet them with a hose and look again
  • Check them at noon and at dusk, because both light conditions matter
  • Confirm clay or concrete in writing on the quote
  • Confirm the pattern in writing too, since it changes labor cost and waste
  • Order extra units from the same run for future repairs

That last one saves you later. Color runs vary between batches, and a patch from a different lot never quite disappears.

Frequently Asked Questions

What Color Brick Pavers Work With a Modern Home?

Single tones and tight blends suit modern homes best, in charcoal, gray or buff ranges. Heavy multi-color red blends read traditional and fight clean lines. Fired clay color comes from the clay and the kiln rather than a pigment coat, so it holds up over decades without fading.

Do Brick Pavers Work With Contemporary Architecture?

Yes, when the unit and pattern are chosen for it. Use large format or long plank shapes, a single tone and a stack bond or long running bond layout. Crisp clean edges suit modern facades, while tumbled units look worn on purpose and clash with them.

What Paver Pattern Suits a Traditional Home?

Basketweave and 45 degree herringbone read the most traditional, and both suit colonial, cottage and farmhouse styles. Standard 4 by 8 units in a blended color add the visual detail that older facades carry. Herringbone also resists shifting under vehicle loads better than any other common pattern.

Are Clay Brick Pavers Better Than Concrete Pavers?

For color life, yes. Clay gets its color from firing, and concrete pavers are pigmented, so they fade under sun over the years. Concrete costs less and offers more shapes. Ask any contractor to state on the quote which product they’re pricing, because the term gets used loosely.

How Do I Choose Pavers That Match My House?

Take full-size samples home and set them against the house in daylight, then wet them and look again. Pick from the two or three colors already dominant on the facade. Match unit size to the scale of the space, and pick the pattern to suit the architecture style.

Why a Skilled Brickmason Delivers Better Results

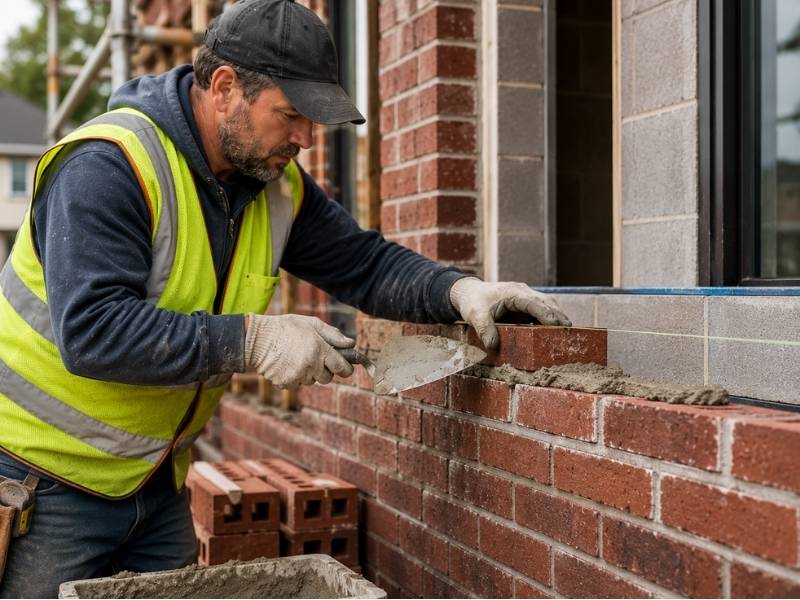
Skilled brickmason wearing a safety vest laying brick with mortar and a string line to build a strong, level masonry wall.

Two brick walls can look alike on day one and tell very different stories ten years later. The difference is the brickmason who built them. A skilled brickmason builds masonry that stays strong, sheds water and holds its shape for decades, while rushed work cracks and leaks long before its time. Good masonry is mostly invisible craft, since the careful choices happen inside the wall where you can’t see them. That hidden skill is what you’re really paying for.

Here’s where an experienced hand makes the difference.

Plan the Job the Right Way

Strong masonry begins long before the first brick is set. A good brickmason starts by reading the plans and checking the foundation, since brick is heavy and needs solid, level support underneath. A weak or uneven base will telegraph cracks straight up through the finished wall.

Layout comes next. The mason measures and dry-lays a course to work out spacing, so the brick pattern lands evenly and cuts fall in sensible spots. This planning avoids awkward slivers of brick and keeps openings for doors and windows square.

Weather and timing factor in too. Mortar needs the right temperature to cure properly, so a skilled mason plans around cold snaps and heavy rain. Setting brick in bad conditions weakens the bond before the wall ever bears a load.

Choose Quality Materials

The right materials decide how long masonry lasts. A brickmason matches the brick grade to the job, since brick rated for severe weather holds up outdoors far better than softer, indoor-rated brick. Using the wrong grade is a common cause of flaking and crumbling down the road.

Mortar is just as important as the brick. The mason mixes the correct mortar type and strength for the wall, because mortar that’s too hard or too soft works against the brick instead of with it. The proportions of sand, cement and lime all affect how the joint performs.

Quality also means consistency. A good mason keeps each batch of mortar mixed the same way, so the whole wall cures and ages evenly. Mismatched batches can leave some joints weaker than others.

Build with Care

Careful building gives a brick wall its strength, not just its looks. The work that keeps a wall standing for generations comes down to three things a skilled brickmason never rushes.

  • Keeping every course level and the whole wall plumb, since a wall that leans even slightly carries its load unevenly. Constant checking with a level and line keeps the structure true from bottom to top.
  • Filling each mortar joint completely and tooling it so the joint sheds water instead of trapping it. Hollow or sloppy joints let water sit, and trapped water is what cracks masonry over time.
  • Laying the bricks in a proper bond so they overlap and spread weight across the wall. Stacking them in weak vertical lines invites cracks, while a solid interlock helps brickwork stand for decades.

That care turns a plain stack of bricks into a wall that lasts.

Handle Problems with Skill

Real job sites rarely go exactly to plan, and experience keeps small surprises from becoming big ones. When a foundation comes in slightly off, a seasoned brickmason adjusts the first courses to bring everything back to level. A beginner might build the error straight up the wall.

Tying new brick into an existing structure takes skill too. The mason matches heights and locks the new work into the old so the two move as one. Done poorly, the seam between old and new becomes a crack waiting to open.

Moisture problems call for know-how as well. A good mason builds in weep holes and flashing where needed, so water that gets behind the brick has a way out. Handling these details quietly prevents the leaks and stains that plague rushed jobs.

Help Masonry Last Longer

Great workmanship is the biggest reason masonry lasts, but a little care extends it further. Walls built with full joints and the right materials already shed water well, which is the single most important factor in a long life. Good work up front saves years of repairs later.

Simple upkeep protects that investment. Keeping plants and sprinklers from soaking the brick, and clearing debris from weep holes, helps the wall stay dry. A quick look each year catches any cracked joint early, while it’s still a small fix.

The payoff is masonry that holds strong for generations. Brick built well by a skilled hand can outlast the people who built it. That long life is the real return on hiring someone who knows the craft.

Frequently Asked Questions

What does a brickmason do?

A brickmason builds and repairs structures using brick, block and stone held together with mortar. The work ranges from walls and chimneys to walkways and home exteriors. A skilled mason handles layout, material choice and the building itself, all with an eye on strength and a clean finish.

Why is good workmanship important?

Workmanship decides whether masonry lasts decades or fails early. Full mortar joints, level courses and the right materials keep water out and spread weight evenly. Poor work might look fine at first, but it tends to crack, lean or leak within a few years.

How do I know if brick work is well done?

Look for straight, plumb walls and mortar joints that are even and fully packed. Quality brickwork has consistent spacing, clean tie-ins and no early cracks or bulges. Water draining away from the wall rather than pooling against it is another good sign.

Can a brickmason repair damaged brick?

Yes, repairing brick is a core part of the trade. A brickmason can replace cracked bricks and repoint crumbling mortar so the fix blends with the surrounding wall. Calling the mason early, while the damage is small, keeps the repair quick and affordable.

What helps brick last a long time?

Solid workmanship is the foundation, since well-built joints keep damaging water out. Beyond that, keeping the brick dry helps most, so manage sprinklers, drainage and gutters around it. A yearly glance for cracked mortar lets you fix small issues before they spread.